BioSculptor is a technology company that designs, manufactures and sells innovative solutions for Orthopedic, Podiatric and P&O practices.
Instructions for use of the BioElastomer Injection Kit
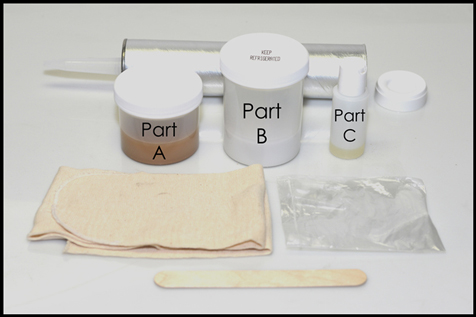
Kit Contents: Part Number CL-2115
- Part A, Silicone Foam (4 oz container)
- Part B, Silicone Rubber (8 oz container)
- Part C, 3 cc of Catalyst
- Lightweight fitting sock
- Plastic separator
- Empty injection tube
- Caulk tube plunger cap
- Tongue depressor
Other materials needed:
- Caulk gun
- Compressed air gun
- Scissors
- Latex gloves
- Syringe
Instructions
Preparation
- Glove hands
- Drill a 3/8” injection hole in the socket; anterior, just proximal to the socket attachment plate. The hole should be drilled in the very bottom of the injection void area.
- Rub Vaseline on the inside distal third of the socket as a release agent
- Protect floor and any other objects that you do want covered in foam.
- Stir container A thoroughly, scrape all material off bottom of container, approximately 15 minutes to make smooth. Make sure all hard sediment is incorporated into the mixture.
- Stir container B thoroughly, scrape all material off bottom of container, approximately 5 minutes to make smooth. Make sure all hard sediment is incorporated into the mixture.
- Mix A and B components together in B component container (8 oz. container) using tongue depressor.
- Using the syringe, draw 1.25 cc of catalyst from part C bottle.
- Cut nipple and puncture inner foil on caulk tube,
- Place small piece of tape over the cut end of caulk tube.
- Have patient don cushion liner or stump sock
- Place plastic separator over liner
- Place walking sock over separator and all the way above knee, make sure fit is snug.
- Don prosthesis and stand in parallel bars, 80% weight bearing on prosthesis (ensure residual limb is fully inside of prosthesis)
Injection
- Inject syringe with catalyst into A/B Components and mix for maximum of 10 seconds
- Pour mixture into tube, add plunger cap and place tube in gun.
- Remove tape and quickly inject “entire” contents into injection hole on prosthesis and place thumb over hole
- Let foam rise all the way up to completely fill voids around patients distal end while keeping hole covered with thumb.
- Once void is completely filled and pressure begins to build, adjust thumb so that only ¾ of the hole is covered and the excess expanding foam and gases escape through the ¼ of the hole that is open; adjust as needed. Check that patient does not feel residual limb being pushed out of socket.
- Hold thumb in place 3-5 minutes until silicone is dry
Finish
- Roll proximal edge of fitting sock over exterior of prosthesis and hold in place while patient removes residual limb from socket
- Place nozzle of air gun into injection hole on prosthesis and use the compressed air to separate silicone from the interior of the socket (do not attempt to remove the pad by pulling on the single ply sock, because this will tear the silicone)
- When the silicone pad is released, use hand to pull pad from the socket and trim excess sock fabric around the edges of the pad
- Return silicone pad to the distal end of the socket using the injection hole as an alignment notch
To reorder BioElastomer Injection Kit call customer service 877-246-2884 or email custsupport@biosculptor.com
Reorder part number CL-2115
Instructional Video on Website
www.biosculptor.com